Admin: Take back control of Office 365 Groups, Teams, and Planner!

Office 365 groups is a great way to promote collaboration between people inside and outside organisations. By default, users are able to create groups freely, making their use easy. However, in many organisations, this has led to chaos.
In this blog, I show how you can get back the control of Office 365 groups, Teams and Planner.
What are Office 365 groups
Office groups are a combination of a “light-weight” SharePoint Online team site and an Exchange Online distribution list. Technically, in Exchange Online, they are called Unified Groups (UG). Other group types are Security Groups (SG) and Distribution Lists (DL). In this blog, we are taking solely about Office groups, not SGs or DLs.
You can list your Office groups using following Exchange Online PowerShell command
# List Unified Groups

Get-UnifiedGroup
Office 365 groups are made for collaboration: they have a built-in calendar, notebook, document library, planner, etc. By default, users are able to create them freely, which makes them also easy to use.
Teams and planner also has an associated Office group.
So what’s the problem
Office 365 group naming and email addresses
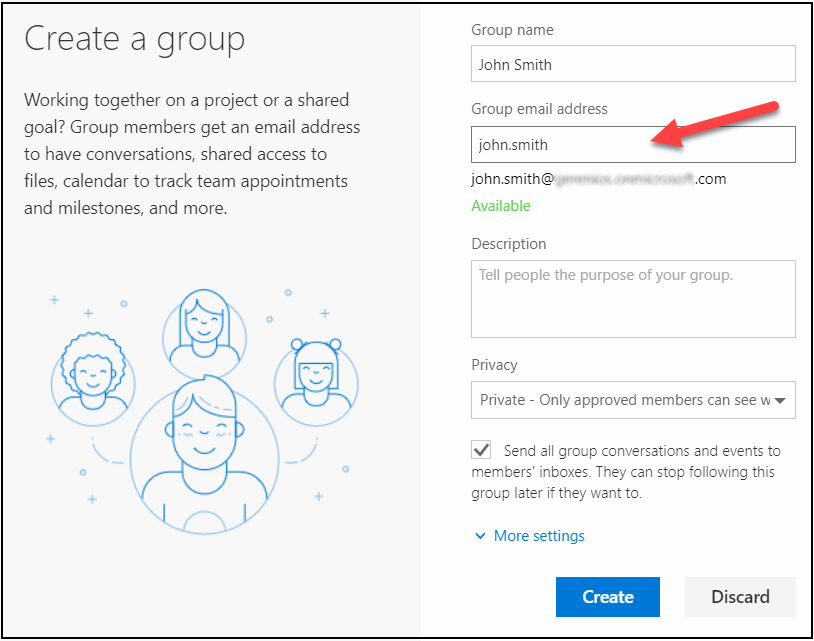
As mentioned earlier, when you create an Office group, you also create a distribution list. As such, it also have an email address, where you can (obviously) send emails to. The name of the group (Display Name of the UG) and email address (alias of the UG) are chosen when the group is created. This is problematic for two reasons. First, this allows users to create working email addresses!
Second, the domain part of the email address will be the default domain of the tenant. If the default domain is used in organisation’s email addresses, this will eventually lead to synchronisation conflicts.

Hidden SharePoint site
When an Office 365 group is created, a SharePoint Online site collection is created. This site collection is hidden, which means that it cannot be seen in SharePoint Online admin center (this is to change in the new admin center). The url will have the alias name of the group. The example seen in the previous screenshot would have the url like: https://mytenant.sharepoint.com/sites/john.smith If you try to create a site collection with the same name, you’ll have an error stating that the site collection already exists.
Getting back the control
In this blog, we are using AzureAD Preview PowerShell module instead of MSOnline I usually use. This is because some of the commands used below were not included in AzureAD (or MSOnline) module at the time this blog was written.
See my blog for install instructions.
Change the default domain
The first step I’d suggest to do is to change the default domain. As the name suggests, the default domain is selected by default when the user is created in Office 365 admin center. It is only selected by default and can be changed as needed. Also, users are typically created in the on-prem AD and synced to Office 365. The second place where the default domain is used is when users are creating groups (or DLs). So, changing the default domain isn’t really any problem.
First, let’s add a new domain to Office 365. In this example, we create a sub-domain to a custom domain added and verified earlier (example.myo365.site). This way you do not need to verify the domain.
# Connect to Office 365

Connect-AzureAD

# List domains

Get-AzureADDomain

# Create a new sub-domain to example.myo365.site and make it default

New-AzureADDomain -Name groups.example.myo365.site -IsDefault $true
Now, when users are creating groups, they are created under the newly added custom domain. Admins can still choose the domain when creating groups in Office 365 admin center.
Use a group naming policy
Many organisations I know are using naming policies for their groups. Typically, SG_ is used as a prefix for security groups and DL_ for distribution lists. So, the natural prefix for Office 365 groups would be UG_
This prefix can be enforced, so when users are creating groups, they will always have the UG_ prefix.
# Get the current settings

$Settings = Get-AzureADDirectorySetting | where DisplayName -eq "Group.Unified"

# Create a new settings from the template if current settings are empty

if(!$Settings){New-AzureADDirectorySetting -DirectorySetting (Get-AzureADDirectorySettingTemplate | where DisplayName -eq "Group.Unified").CreateDirectorySetting()}
$Settings = Get-AzureADDirectorySetting | where DisplayName -eq "Group.Unified"

# Add a UG_ prefix

$Settings["PrefixSuffixNamingRequirement"] = "UG_[GroupName]"

# Save the settings

Set-AzureADDirectorySetting -DirectorySetting $Settings -Id $Settings.Id
Limit Office 365 group creation
You can limit Office Group creation to members of a security group. To utilise this, you need to create a security group directly to Office 365 or to your on-prem AD, such as, O365GroupCreators. Of course, you can also use an existing security group.
Note! There can be only one group, but it can have as many nested groups as needed.
# $Settings variable set in previous example


# Disable group creation

$Settings["EnableGroupCreation"] = $False

# Set the group allowed to create Office 365 groups

$Settings["GroupCreationAllowedGroupId"] = (Get-AzureADGroup -SearchString "O365GroupCreators").objectid

# Save the settings

Set-AzureADDirectorySetting -DirectorySetting $Settings -Id $Settings.Id
Now only the members of O365GroupCreators group can create Office 365 groups, Teams and Planner plans. However, most administrators, such as Global Admins, are still able to create Office 365 groups in Office 365 admin center.
